
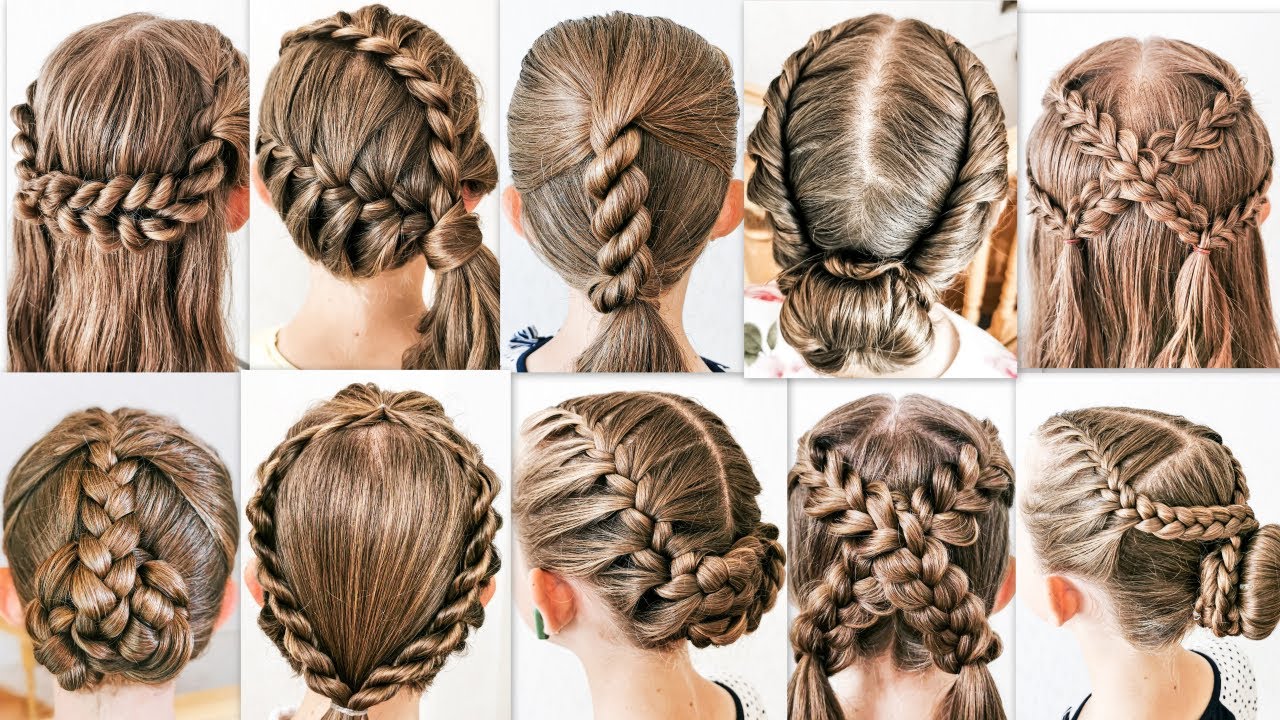
Welcome to the world of cute hairstyles for braids, where creativity and style intertwine to create stunning and versatile looks. From intricate French braids to playful pigtails, the possibilities are endless. This guide will delve into the art of braiding, providing step-by-step instructions, inspiring ideas, and expert tips to help you master the craft and elevate your hair game.
Whether you have short, medium, or long hair, fine or thick strands, there’s a braid hairstyle waiting to transform your look. Braids add texture, volume, and a touch of elegance to any occasion, from casual outings to special events.
Cute Braid Hairstyles for Short Hair

Braids are a versatile and stylish way to wear short hair. They can be simple or elaborate, and they can be dressed up or down. Here are a few cute braid hairstyles that are perfect for short hair:
French braid: A French braid is a classic braid that is both elegant and timeless. To create a French braid, start by dividing your hair into three sections. Cross the right section over the middle section, then cross the left section over the new middle section. Continue braiding in this way, adding hair from the sides as you go. Once you reach the end of your hair, secure the braid with a hair tie.
Dutch braid: A Dutch braid is similar to a French braid, but it is braided upside down. This creates a raised braid that is more voluminous and eye-catching. To create a Dutch braid, start by dividing your hair into three sections. Cross the left section under the middle section, then cross the right section under the new middle section. Continue braiding in this way, adding hair from the sides as you go. Once you reach the end of your hair, secure the braid with a hair tie.
Fishtail braid: A fishtail braid is a beautiful and unique braid that is perfect for short hair. To create a fishtail braid, start by dividing your hair into two sections. Take a small section of hair from the outside of the left section and cross it over to the inside of the right section. Repeat this process on the other side, taking a small section of hair from the outside of the right section and crossing it over to the inside of the left section. Continue braiding in this way until you reach the end of your hair. Secure the braid with a hair tie.
Accessorizing and Styling
There are many ways to accessorize and style short hair braids. You can add ribbons, beads, or other embellishments to your braids. You can also use hairspray to hold your braids in place or to create a more polished look. If you want to add volume to your braids, you can tease your hair before you braid it.
Short hair braids are a great way to add style and personality to your look. With a little practice, you can create a variety of beautiful and unique braids that will turn heads.
– Provide step-by-step s with clear and concise language.

Braiding is a versatile and beautiful way to style your hair. It can be used to create a variety of looks, from simple and elegant to elaborate and dramatic. Whether you’re a beginner or a seasoned pro, there are always new braiding techniques to learn.
In this section, we’ll provide you with step-by-step s for a variety of braid hairstyles. We’ll also include high-quality images or videos to illustrate the braiding techniques.
Braiding Basics
[detailed content here]
– 3. Elaborate Braided Hairstyles for Long Hair
Dutch Braids
Dutch braids, also known as inside-out braids, create a stunning and intricate effect. To create a Dutch braid, divide your hair into three sections and cross the right strand over the middle, then the left strand over the new middle. Continue this pattern, always bringing the outer strands underneath.
French Braids, Cute hairstyles for braids
French braids are a classic and versatile braid that can be dressed up or down. To create a French braid, start by dividing your hair into three sections. Cross the right strand over the middle, then take a small section of hair from the right side and add it to the right strand. Cross the new right strand over the middle. Repeat this process on the left side.
Fishtail Braids
Fishtail braids create a unique and elegant look. To create a fishtail braid, divide your hair into two sections. Take a small strand from the outside of the left section and cross it over to the inside of the right section. Repeat this process on the other side.
Waterfall Braids
Waterfall braids are a beautiful and romantic braid that creates the illusion of a waterfall. To create a waterfall braid, start by dividing your hair into two sections. Take a small strand from the outside of the left section and cross it over to the inside of the right section. Then, instead of adding it to the right section, let it fall down. Repeat this process on the other side.
Dutch and French Braid Variations
Dutch and French braids are two of the most popular braiding techniques, and they can be used to create a variety of beautiful and stylish hairstyles. Both techniques involve crossing three strands of hair over each other, but there are some key differences between the two.
Dutch braiding (also known as reverse braiding) is created by crossing the strands under each other, rather than over each other as in French braiding. This results in a braid that is raised and has a more three-dimensional look. Dutch braids are also more secure than French braids, making them a good choice for active people.
French braiding is created by crossing the strands over each other, rather than under each other as in Dutch braiding. This results in a braid that is flatter and has a more delicate look. French braids are also less secure than Dutch braids, making them a better choice for casual or formal occasions.
Both Dutch and French braids can be used to create a variety of hairstyles, including buns, ponytails, and half-up styles. They can also be embellished with ribbons, beads, or other accessories.
Waterfall Braid
The waterfall braid is a beautiful and unique variation on the French braid. It is created by starting a French braid at the top of the head and then allowing the bottom strand to fall out as you continue to braid. This creates a cascading effect that is both elegant and eye-catching.
Inside-Out Braid
The inside-out braid is another fun and easy variation on the French braid. It is created by starting a French braid at the top of the head and then crossing the strands over each other from the inside out. This results in a braid that is more textured and has a more interesting look.
Braided Ponytails and Updos
Braided ponytails and updos are versatile and stylish hairstyles that can be dressed up or down. They are perfect for any occasion, from a casual day out to a formal event.
There are many different ways to create braided ponytails and updos. Some of the most popular styles include:
- French braid ponytail: This ponytail is created by braiding a French braid down the back of the head and then securing it with a hair tie.
- Dutch braid ponytail: This ponytail is created by braiding a Dutch braid down the back of the head and then securing it with a hair tie.
- Fishtail braid ponytail: This ponytail is created by braiding a fishtail braid down the back of the head and then securing it with a hair tie.
- Braided bun: This updo is created by braiding the hair into a bun and then securing it with bobby pins.
- Braided crown: This updo is created by braiding the hair around the head and then securing it with bobby pins.
To add volume and texture to braided ponytails and updos, try using a volumizing spray or mousse. You can also tease the hair at the roots or add extensions.
Braided Headbands and Crowns
Braided headbands and crowns are stylish and versatile hair accessories that can elevate any look. They are perfect for adding a touch of elegance to a casual outfit or dressing up a formal ensemble. There are many different braiding techniques that can be used to create these accessories, including French braids, Dutch braids, and fishtail braids. Embellishments such as beads, ribbons, and flowers can be added to personalize and enhance the look of the headbands and crowns.
Basic Braided Headband
To create a basic braided headband, start by dividing your hair into two equal sections. Braid each section of hair, starting from the front of your head and working your way back. Once you have two braids, cross them over each other at the back of your head and secure them with bobby pins. You can then adjust the headband to fit your head and style it as desired.
Braided Bangs and Fringe
Braided bangs and fringe add a touch of whimsy and charm to any hairstyle. From simple braids to intricate designs, there are countless ways to incorporate braids into your bangs or fringe.
One popular option is the side-swept braided bang. This style involves braiding a small section of hair from the side of your head and sweeping it across your forehead. You can secure the braid with a bobby pin or leave it loose for a more casual look.
Styling and Maintaining Braided Bangs
To style braided bangs, start by dampening your hair. This will make it easier to braid and prevent frizz. Once your hair is damp, apply a small amount of mousse or gel to help hold the braid in place. Then, braid your bangs as desired. Once the braid is complete, you can secure it with a bobby pin or leave it loose.
To maintain braided bangs, it is important to keep them clean and free of tangles. Wash your bangs regularly with a gentle shampoo and conditioner. When brushing your bangs, be sure to use a soft-bristled brush and avoid brushing too vigorously.
– Design a collection of cute braided hairstyles for bobs and lobs, suitable for different face shapes and hair textures.
Braided hairstyles are a versatile and stylish option for bobs and lobs, adding texture, volume, and interest to the hair. Whether you have a short bob or a longer lob, there are many different braided styles that can flatter your face shape and hair texture.
When choosing a braided hairstyle for your bob or lob, consider the length and texture of your hair. If you have a shorter bob, you may want to opt for a simpler braid, such as a French braid or a fishtail braid. If you have a longer lob, you can experiment with more elaborate braids, such as a Dutch braid or a crown braid.
Braided Bobs and Lobs for Different Face Shapes
- Oval face: Oval faces can wear most types of braids, but they look especially good with braids that are swept to the side or worn up in a bun.
- Round face: Round faces look best with braids that are worn off the face, such as a side braid or a Dutch braid. Avoid braids that are too tight or too close to the face, as they can make the face look wider.
- Square face: Square faces look best with braids that are worn down and loose, such as a fishtail braid or a waterfall braid. Avoid braids that are too tight or too structured, as they can make the face look more angular.
- Heart face: Heart faces look best with braids that are worn up and off the face, such as a crown braid or a chignon. Avoid braids that are too tight or too close to the face, as they can make the forehead look wider.
Braided Layers and Textures

Braiding offers endless possibilities for creating unique and stylish hairstyles. By incorporating layers and textures into your braids, you can add depth, dimension, and interest to your hair. From intricate fishtail braids to chunky rope braids, there are countless techniques to achieve different textures.
Blending and Styling Braided Textures
When combining braids with different textures, it’s essential to blend them seamlessly to create a cohesive look. You can achieve this by gradually transitioning from one texture to another, starting with a tighter braid and gradually loosening it as you move down the hair shaft. Additionally, using hairspray or mousse can help hold the braids in place and prevent them from unraveling.
Step-by-Step Guide: Braided Layers with Fishtail and Rope Braids
1. Start by creating a small section at the crown of your head. Divide this section into two equal strands.
2. Cross the right strand over the left strand and then cross the left strand under the right strand.
3. Continue this pattern until you reach the desired length of the fishtail braid.
4. Secure the fishtail braid with a hair tie.
5. Take a new section of hair from the side of your head and create a rope braid.
6. To create a rope braid, simply twist the two strands of hair together in a clockwise direction and then in a counterclockwise direction.
7. Repeat steps 5 and 6 until you have created a rope braid of the desired length.
8. Connect the fishtail braid and the rope braid together using a hair tie or bobby pins.
9. Repeat steps 1-8 on the other side of your head to create a symmetrical look.
Before and After Photos
[Include before and after photos to demonstrate the transformation of hair using braided layers and textures.]
Braided Pigtails and Buns

Braided pigtails and buns are adorable and versatile hairstyles that can be dressed up or down. They’re perfect for any occasion, from a casual day out to a formal event. Plus, they’re relatively easy to do, even for beginners.
To create braided pigtails, simply divide your hair into two sections and braid each section. You can then tie the braids together at the ends or leave them loose. To create a braided bun, braid your hair and then wrap it around itself to form a bun. You can secure the bun with bobby pins or a hair tie.
Tips for adding volume and personality to braided pigtails and buns
- Tease your hair before braiding it to create more volume.
- Use different types of braids, such as French braids, Dutch braids, or fishtail braids, to add interest to your hairstyle.
- Add hair accessories, such as ribbons, bows, or beads, to your braids or buns to personalize your look.
Braided Halo and Half-Up Styles
Braided halo and half-up styles are versatile and eye-catching hairstyles that combine intricate braiding with a touch of elegance. These styles are perfect for special occasions or everyday wear and can be customized to suit different hair lengths and textures.
To achieve a braided halo, start by parting your hair down the middle and creating two French braids on either side of your head. Once the braids are complete, bring them together at the back of your head and secure them with bobby pins. You can then wrap the braids around your head to create a halo effect.
For a half-up style, start by parting your hair horizontally from the top of your ears to the nape of your neck. Braid the top section of your hair and secure it with a hair tie. You can then style the bottom section of your hair as desired, such as leaving it down, curling it, or putting it in a bun.
Accessorizing and Styling
Braided halo and half-up styles can be accessorized with a variety of items, such as headbands, hair clips, and flowers. You can also add some volume to your braids by teasing them gently with a comb.
Braided Twists and Knots
Braided twists and knots are a great way to add some style and personality to your look. They can be worn on short, medium, or long hair, and they can be dressed up or down. In this guide, we will show you how to create some of the most popular braided twists and knots, and we will provide tips on styling and maintaining them.
Braiding Techniques
There are a number of different braiding techniques that can be used to create twists and knots. Some of the most popular techniques include:
- Two-strand twists: This is the simplest type of twist, and it can be created by twisting two strands of hair together.
- Three-strand braids: This is a more complex type of braid, and it can be created by braiding three strands of hair together.
- Four-strand braids: This is a more advanced type of braid, and it can be created by braiding four strands of hair together.
- French braids: This type of braid is created by braiding the hair from the crown of the head down to the nape of the neck.
- Dutch braids: This type of braid is similar to a French braid, but it is created by braiding the hair from the nape of the neck up to the crown of the head.
Choosing the Right Technique
The type of braiding technique that you choose will depend on your hair type and the style that you want to create. If you have fine hair, you may want to use a two-strand twist or a three-strand braid. If you have thick hair, you may want to use a four-strand braid or a French braid. If you want to create a more intricate style, you may want to use a Dutch braid.
Step-by-Step Guide
Here is a step-by-step guide on how to create a simple two-strand twist:
- Start with damp hair.
- Divide your hair into two sections.
- Take the right section of hair and cross it over the left section.
- Take the left section of hair and cross it over the right section.
- Continue twisting the hair until you reach the end.
- Secure the twist with a bobby pin.
Troubleshooting
If you are having trouble creating a braided twist or knot, here are a few tips:
- Make sure that your hair is damp. This will help to prevent the hair from tangling.
- Use a small amount of hairspray to help hold the braid in place.
- If you are having trouble keeping the braid tight, try using a smaller section of hair.
- If you are having trouble creating a specific type of braid, try watching a tutorial online.
Recommended Products
Here are a few recommended products for styling and maintaining braided twists and knots:
- Hairspray: This will help to hold the braid in place.
- Mousse: This will help to add volume to the braid.
- Gel: This will help to define the braid.
- Bobby pins: These will help to secure the braid in place.
Braided Accessories and Embellishments: Cute Hairstyles For Braids
Incorporating accessories and embellishments into braided hairstyles can elevate their charm and add a touch of personalization. Experiment with hair clips, beads, ribbons, and other decorative elements to create unique and eye-catching looks.
Hair clips, available in various shapes, sizes, and designs, can be used to secure braids, add accents, or create intricate patterns. Beads, with their vibrant colors and textures, can be threaded onto braids for a bohemian or ethnic touch. Ribbons, in different widths and fabrics, can be woven into braids or tied around them for a feminine and elegant effect.
Hair Clips
- Use bobby pins to secure small braids or add delicate accents.
- Experiment with decorative hair clips featuring embellishments like pearls, crystals, or flowers.
- Create intricate patterns by arranging multiple hair clips along the braid.
Beads
- Choose beads that complement the hair color and style.
- Thread beads onto braids for a bohemian or ethnic vibe.
- Use beads as spacers between different braid sections.
Ribbons
- Incorporate ribbons into braids for a feminine and elegant touch.
- Tie ribbons around braids to create a whimsical or romantic effect.
- Use ribbons of different widths and textures for added visual interest.
– Design a collection of cute braid hairstyles suitable for special occasions, such as weddings, proms, and parties.
Braided hairstyles are a timeless and versatile choice for special occasions. They can be elegant, romantic, or playful, and they can be adapted to suit any hair type or length. In this article, we will discuss the different braiding techniques and styles that are appropriate for special occasions, and we will provide step-by-step s for each hairstyle. We will also include tips on accessorizing and styling braided hairstyles for special occasions.
Braiding Techniques and Styles for Special Occasions
There are many different braiding techniques and styles that can be used to create beautiful hairstyles for special occasions. Some of the most popular techniques include:
- French braid: A French braid is a classic braiding technique that creates a tight, intricate braid. French braids can be worn on their own or used to create more elaborate hairstyles.
- Dutch braid: A Dutch braid is similar to a French braid, but it is created by crossing the strands under instead of over. This creates a raised, textured braid that is perfect for special occasions.
- Fishtail braid: A fishtail braid is a unique and beautiful braiding technique that creates a braid that resembles a fishtail. Fishtail braids can be worn on their own or used to create more elaborate hairstyles.
- Crown braid: A crown braid is a beautiful and elegant braiding style that is perfect for special occasions. Crown braids are created by braiding the hair around the head, creating a crown-like effect.
- Halo braid: A halo braid is a similar braiding style to a crown braid, but it is created by braiding the hair around the head in a halo shape.
Step-by-Step for Braided Hairstyles for Special Occasions
Here are step-by-step s for some of the most popular braided hairstyles for special occasions:
French Braid
- Start by brushing your hair to remove any tangles.
- Section off a small piece of hair from the top of your head.
- Divide the section into three strands.
- Cross the left strand over the middle strand.
- Cross the right strand over the new middle strand.
- Continue crossing the strands over each other until you reach the end of your hair.
- Secure the braid with a hair tie.
Dutch Braid
- Start by brushing your hair to remove any tangles.
- Section off a small piece of hair from the top of your head.
- Divide the section into three strands.
- Cross the left strand under the middle strand.
- Cross the right strand under the new middle strand.
- Continue crossing the strands under each other until you reach the end of your hair.
- Secure the braid with a hair tie.
Fishtail Braid
- Start by brushing your hair to remove any tangles.
- Divide your hair into two equal sections.
- Take a small piece of hair from the outside of the left section and cross it over to the inside of the right section.
- Take a small piece of hair from the outside of the right section and cross it over to the inside of the left section.
- Continue crossing the strands over each other until you reach the end of your hair.
- Secure the braid with a hair tie.
Crown Braid
- Start by brushing your hair to remove any tangles.
- Section off a small piece of hair from the top of your head.
- Divide the section into three strands.
- Cross the left strand over the middle strand.
- Cross the right strand over the new middle strand.
- Pick up a small piece of hair from the left side of your head and add it to the left strand.
- Cross the left strand over the middle strand.
- Cross the right strand over the new middle strand.
- Pick up a small piece of hair from the right side of your head and add it to the right strand.
- Continue crossing the strands over each other, adding hair from the sides of your head as you go.
- When you reach the end of your hair, secure the braid with a hair tie.
Halo Braid
- Start by brushing your hair to remove any tangles.
- Section off a small piece of hair from the top of your head.
- Divide the section into three strands.
- Cross the left strand over the middle strand.
- Cross the right strand over the new middle strand.
- Pick up a small piece of hair from the left side of your head and add it to the left strand.
- Cross the left strand over the middle strand.
- Cross the right strand over the new middle strand.
- Pick up a small piece of hair from the right side of your head and add it to the right strand.
- Continue crossing the strands over each other, adding hair from the sides of your head as you go.
- When you reach the back of your head, cross the left strand over the middle strand.
- Cross the right strand over the new middle strand.
- Secure the braid with a hair tie.
Tips on Accessorizing and Styling Braided Hairstyles for Special Occasions
There are many different ways to accessorize and style braided hairstyles for special occasions. Here are a few tips:
- Add flowers or other hair accessories to your braid.
- Use a curling iron or wand to create waves or curls in your braid.
- Pull out a few strands of hair around your face to create a softer look.
- Use a hairspray to hold your braid in place.
How to Care for Braided Hairstyles
To keep your braided hairstyle looking its best, it is important to care for it properly. Here are a few tips:
- Brush your hair gently to remove any tangles.
- Avoid using heat styling tools on your braid.
- Sleep on a satin pillowcase to prevent your braid from getting frizzy.
- Take your braid down every few days to give your hair a break.
Best Braiding Techniques and Styles for Different Hair Types
Choosing the right braiding technique and style for your hair type is essential to achieving a beautiful and long-lasting look. Here’s a table summarizing the best options for different hair types:
| Hair Type | Best Braiding Techniques | Best Braiding Styles |
|---|---|---|
| Fine Hair | French braids, Dutch braids, fishtail braids | Crown braids, halo braids, braided headbands |
| Medium Hair | Box braids, cornrows, three-strand braids | Pigtails, buns, braided ponytails |
| Thick Hair | Jumbo braids, Ghana braids, Senegalese twists | Braided updos, braided chignons, braided crowns |
| Curly Hair | Knotless braids, crochet braids, Senegalese twists | Braided buns, braided halos, braided headbands |
Wrap-Up
In the realm of hair styling, braids reign supreme as a symbol of beauty, versatility, and timeless charm. Embrace the art of braiding, experiment with different techniques, and unleash your creativity. Let your braids tell a story of style, confidence, and individuality. With the knowledge and inspiration gained from this guide, you’ll be ready to conquer any hair challenge and turn heads wherever you go.
FAQ Resource
What are some easy braid hairstyles for beginners?
French braids, Dutch braids, and three-strand braids are great starting points for beginners. These braids are relatively simple to master and can be dressed up or down depending on the occasion.
How do I prevent my braids from getting frizzy?
To minimize frizz, use a hair serum or oil before braiding. Braid your hair when it’s slightly damp, as dry hair is more prone to frizz. Additionally, avoid brushing your braids too often, as this can create friction and cause frizz.
Can I braid my hair every day?
While braiding can be a protective style, it’s not advisable to braid your hair every day. Constant tension on the hair can lead to breakage. Aim to braid your hair 2-3 times a week, allowing your hair to rest in between.